Thursday, December 22, 2011

Super Easy Reindeer Peanut Butter Cookies

Super Easy Reindeer Peanut Butter Cookies


Recipe:

1 cup sugar
1 cup peanut butter
1 large egg
1 teaspoon vanilla extract

Mix all the ingredients together in a bowl until well mixed.  Shape the dough into a 1 inch ball and place on cookie sheet:


After all the balls are made, use a cup to flatten out the balls:


When all the balls are flattened, use your finger to pinch the top side of the ball:


If you would like, you can use the cup to flatten them out again. 
Bake the cookies in the oven at 350 deg. for 15 minutes.

While the cookies are baking, cut up the pretzels to make antlers.  Match up similar pretzel pieces two at time so that you can work quickly when the cookies are done.  Make sure you have enough antlers for every cookie.


Place the red m & m's in a bowl, along with the chocolate chips in a separate bowl.

When the cookies are done, pull them out of the oven.
Immediately shake sea salt over the cookies (if desired):


Then add the pretzel antlers first, then the m&m nose, and last the chocolate chip eyes.


Work fast before the cookie starts to cool.  It is nice to have two people working together.

Makes about 2 dozen cookies.  (But for me, I'm usually short one or two)

Enjoy!
Happy Holly Days!

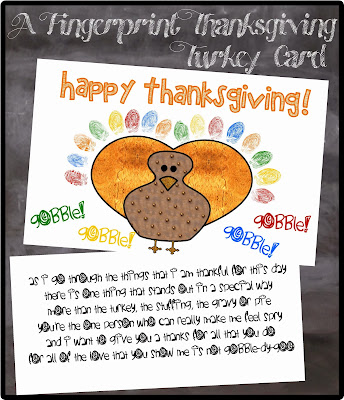
Now you can make a card to go with you cookies by going here
http://hollyshome-hollyshome.blogspot.com/2013/11/a-fingerprint-reindeer-christmas-card.html


Check out all of my Christmas Ideas by clicking here.


Thursday, November 3, 2011

Thankful Turkey Coloring Craft


Here's a fun activity to do while the turkey is baking.  Print out the page, cut out the turkey and the feathers.  Color the turkey and the feathers.  Write on each feather what you are thankful for.  Glue the feathers onto the turkey.  Happy Thanksgiving!  Be sure to check out some of my other fun, kid friendly Thanksgiving activities at the bottom of the blog.

Some other ways to use this craft is to have each family member write what they are thankful for on a feather, then attach them all to the same turkey.  I would even be fun if each person colored their feather so that each feather is unique.  Display the turkey at your Thanksgiving feast!

PIN THE FEATHER ON THE TURKEY - have each person color their feather and write what they are thankful for.  Then blind fold them, one by one, and see who can get their feather closest to the turkey.  Have a prize for the closest turkey feather.


Just right click and copy.  Paste into your program.  Enlarge to fit the page. 
Print it out on card stock for best results.

Here's a Thanksgiving Turkey Fingerprint Card that you can make:
http://hollyshome-hollyshome.blogspot.com/2013/11/a-fingerprint-thanksgiving-turkey-card.html

Or have the kids help you decorate the table with these fun printouts:
http://hollyshome-hollyshome.blogspot.com/2013/11/free-thanksgiving-place-card-printables.html


Here are some more fun Thanksgiving ideas:
http://hollyshome-hollyshome.blogspot.com/p/fun-and-free-thanksgiving-ideas-for.html


Saturday, October 1, 2011

Make a Trick-or-Treater from a 2 Liter Pop Bottle


I made these several years ago, when my children were still small.  They have always been one of my favorite Halloween decorations because every year I have my kids draw a new mask on a paper sack for the Trick-or-Treaters.  It has become a family tradition that I hope to carry on with my grand kids.  These are very simple to make, and I am sure that there are many ways that you can doctor them up to make them absolutely fabulous!

Clean out a 2 liter pop bottle.  Fill it with beans, or small rocks.  Put the lid back on.  Use the patterns below to create your Trick-or-Treater.  I love this project because it is so easy.

Here are the patterns for the dress, arms and hands.  Just click on the pattern for a larger version.  Then you can either copy it, or save it.  When you paste it, make sure you size it to fit to the edges of the paper.  The dress pattern is not to size.


Follow the directions on the pattern to make the arms, hands and bag.  Glue the top of the hands on either side of the neck of the bottle.  See pictures below for example.

Once you have the dress cut out, , sew the two 12" sides together on the wrong side of the fabric. Then hem the bottom edge. Gather the top edge together and glue around the neck of the bottle.


Glue the cuff of the sleeve over the wrist of the hands.  Glue the hands to the burlap bag.


Fold over the burlap.  Hand stitch the two edges.  Pull off some of the thread of the burlap for a rustic look.  Glue the hands to the top of the bag.


Glue each arm on the side of the neck as shown above.
Cut off the bottom of a small brown paper bag.  Have the child draw a face on the bag.  Place the bag on top of the Trick-or-Treater.

This pattern is for a simple trick-or-treater.  You can add whatever embellishments you would like to make your trick-or-treater custom to your taste.
Happy Halloween!

Friday, September 9, 2011

Grandparent's Day Card

Card Outside
I have two versions.  One say Grandpa and Grandma, the other is blank for you to customize.

Card Inside


Printout for the outside of the card.  I printed it on a full sheet of card stock. I have found that if you click on the picture and then either copy it, or save it, then you can paste it (or insert it) on a Printshop type program.  Enlarge it to fit across the bottom of the page.


Here are the two printouts for the card.  One says Grandpa and Grandma, the other one you can customize to whatever you want:
Just color and cut out the sign and the flower pot.  Glue the sign on the front of the card.  For dimension you can use foam tape to attach the sign to the front of the card.  Look at the pictures below for the inside of the card. The sheet for the inside of the card measures   6" x 6" and the slit is about 1/2" wide and 1 1/2" deep.  See picture below:


For cute clip art like the ones in this card go to DJinkers:

Check out this cute Mother's Day Card.   Just click on the link below: 


Check out this cute Father's Day Card. Just click on the link below: 

Saturday, August 20, 2011

Make a Scrapbook From Paper Bags

Our family made these scrapbooks while on vacation.  They are made out of two or three paper bags.  Lay two or three paper bags neatly on top of each other. Carefully fold them in half, then punch five holes in the spine . 

You will need a heavy duty hole punch, or I used a heavy duty three hole punch.  Tie the holes in the spine with a cute ribbon.  Decorate the pages with scrapbook papers and pictures from your vacation.

Make a file page that fits into the open end of the lunch bag.  You can add a tab to pull out the page.  Each family member got to make their own scrapbook, and had a great time doing it.  From the youngest to grandma, we had everyone involved.  Each person came up with their own ideas and came up with unique ideas on how to use the pictures.  It was so much fun. 

You can use them for a birthday party, a church activity, a family reunion, girl's camp, a school classroom, or whatever else you can think of.